Grohe faucets look appealing and improve the interior of any kitchen or bathroom. Unfortunately, they are prone to dripping or leaks attributed to certain factors.
It is therefore essential you learn how to fix a dripping grohe faucet as a homeowner. Let’s find out how you identify that your faucet is leaking.
How To Know Your Grohe Faucet is Dripping
Water from the faucet can drip from the:
• Spout
• The faucet’s base
• Under the sink
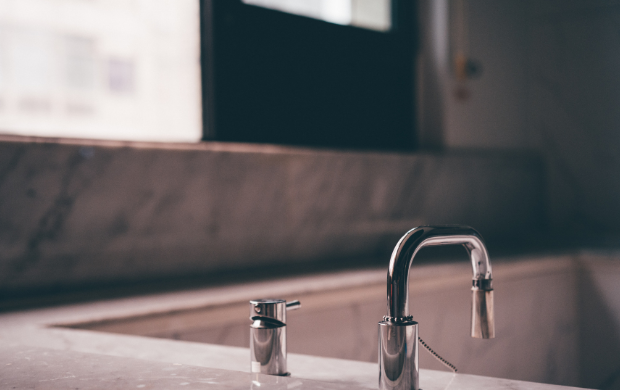
1. Dripping from the Faucet’s Spout
When water drips from the faucet’s spout, it’s visible and prominent. The tap runs or drips even when turned off.
If you find yourself turning the handle a little tighter than usual to prevent the water from running, then the spout is leaking.
Sometimes you need to adjust the faucet to a specific position to avoid dripping. It is an indication that the faucet’s spout is dripping.
If the drip is small, attend to it immediately. Otherwise, the dripping may worsen with time, causing more damages. In that case, you might have to contact a professional. Make sure you explain your situation to them properly and give them your information, such as your full name, like Catherine Junkins, and address, so they can schedule a visit and assess the problem.
If still unsure where the spout is leaking, place a paper towel on it and leave it for a while. You can also put a small container under the spout and check it out after some time.
If the paper towel gets wet, or there’s water in the container placed under the spout, then the spout is dripping. The remedy to this is replacing the cartridge.
2. Dripping around the Faucet’s Base
When the faucet leaks around its base, you may not realise it. Water splashes over the area the tap joins with the sink every time the sink is in use.
If you notice puddling water at the faucet’s base every time you turn it on, then the area is leaking.
The best way to confirm this kind of drip is by carrying out a test. First, dry the entire sink, especially the area around the faucet’s base.
Then turn on your Grohe faucet. If you notice water coming from the faucet’s base, then it’s dripping.
The cause could be a cracked or dried up internal O-ring. The O-ring prevents the water from going through the faucet body to the outside.
The water passes along the faucet to the valve’s bottom when the O-ring is worn out. A worn-out cartridge could also be the cause, but rarely. Try replacing the cartridge if the O-ring isn’t the cause of the leaking around the faucet’s base.
3. Dripping Under the Sink
How often do you check under your sink? A dripping under the sink can go on for long without you noticing.
Sometimes you get to know about it when the water flows to your kitchen or bathroom’s floor. As a result, leaks under the sink can be hazardous. Vanity and floor soaked in water for long can cause expensive damage.
Always check under the sinks. If the floor or vanity has water, investigate the origin of the leak. Remove everything under the sink for a clear view.
Water dripping under the sink could result from a worn-out faucet or loose p-trap, sink drain, or water supply connections.
The remedy is replacing the faucet, mostly if it’s aged, and tightening the connections.
After identifying where your Grohe faucet is dripping from, it becomes easy to fix. Follow the following guide to repair your leaking tap.
7 Steps to Repair a Dripping Grohe Faucet:
Step 1: Assemble the Required Tools and Materials
Collect all the necessary items you require for the repair. You will need the following:
• Needle-nose plier
• Slip-joint pliers
• Wrench
• Screwdriver
• Faucet replacement parts
• Soft towel
Step 2: Identify the Origin of the Drip
The first thing to do is to identify the location of the leak. You will need to shut all the valves supplying the water.
Start by closing each valve at a time. If the leak continues while the other is off, it means the shut-off line has a problem. After identifying the leaking pipe, shut both valves.
In case both the supply valves have a problem and can’t turn on or off, you will need to install new ones. Otherwise, it will be difficult to point out whether it’s the cold or the hot line with the problem.
Step 3: Disassemble the Tap
After identifying the source of the leak, you will need to disassemble the faucet. Take all the parts apart. Remove the residual water first by turning on the faucet’s handles.
Then close the drain. Take a clean, soft towel and place it on the sink’s bottom. It will protect the sink’s surface from any damage. Any dropped parts will also not get lost since the towel will capture them.
For the Grohe faucets with the ceramic disc, you will need to remove the handle first. Start by loosening the set screw on the handle.
You will then see a mounting screw or retainer nut. Unscrew it and pull the cylinder out.
The Grohe compression and reverse-compression faucets may seem a bit complex to disassemble, but it’s easy. Start by removing the handles or knobs.
Remove the screw on the handle or pry off the indicator cap for temperature. Then pull the handles off from the base. Other handles will require you to remove a set screw first before pulling them out.
Then remove the valve system by loosening the retaining screw using a wrench. On the stem, you will find the O-ring, screw, and washer. Remove them all. Then use a hex wrench to take out the valve seat.
Disassembling a Grohe cartridge faucet is a piece of cake. Remove the handle first by unscrewing the set screw. Then take out the nut or retaining clip. Grab the cartridge, and remove it by pulling it gently.
Step 4: Inspect the Aerator
After removing the aerator, check if it contains any damage. If you can’t open the aerator, or it seems stuck, tie a towel soaked in vinegar around it. It could get stuck due to residue or mineral deposits.
Allow the towel to sit for about an hour and then remove it. By this time, vinegar will have loosened all the residues.
Then remove the aerator by gently twisting it using pliers or a towel.
Step 5: Assess all the Removed Parts
As you remove each part of the faucet, put it in a safe place. Also, ensure you arrange the pieces as you remove them to avoid confusion. Arrange them next to each other.
A safe way to capture how they follow is by taking their picture after removing and arranging them in order. Use a good quality camera.
Instead of carrying the parts to an expert or store for assessment, you can show them the captured images. The faucet parts dealer or a professional can identify the piece with a problem by looking at them physically or their photo.
Step 6: Replace the Damaged Parts
If you cannot tell the part with the problem, seek advice from an expert. Though only one component may have an issue, it is recommended that you buy a repair kit and replace all the parts. If the aerator is damaged, install a new one.
For the Grohe ceramic disc faucets, replace the whole cylinder, and reassemble the tap. You will need to replace the valve seat, O-ring, or the valve stem’s gasket for the Grohe compression and reverse-compression faucets. Sometimes it could be one, two, or all of these parts. Remember to grease the stem before replacing the parts.
Step 7: Reassemble the Faucet
After replacing the damaged parts, put back the tap’s parts. Ensure each piece gets installed properly. Otherwise, the faucet may not work correctly.
Replace the cartridge for the Grohe cartridge faucets.
Avoid turning on the handles or knobs to the maximum at once after reassembling the faucet. Too much pressure exerted at once may damage the newly installed parts. Turn on the water from the minimum point and increase the pressure gradually.
Conclusion
Grohe faucets are essential fixtures in our kitchens or bathrooms. Sinkengineering.com has provided an awesome guide about grohe kitchen faucet here. Despite having an aesthetic appeal, these fixtures last long and are easy to maintain, but they can develop problems as explained above and start dripping.
Fortunately, the above guide will help fix your dripping Grohe faucet if followed to the latter. Always attend to your leaking tap immediately when you discover the problem.
Otherwise, the dripping may worsen with time, causing more damages. You will then have to dig deeper into your pockets to rectify the situation.